The below post describes the complete procedure about installing and configuring the certificate to the WebLogic Server once you got certificates from Verisign
After applied for Certificates, Verisign has issued 3 files .
1. Sever certificate (E.g.: example.com.crt)
2. Vendor certificate(E.g.: verisignCertificate.crt)
3. Private key(E.g.: private.key)
Server certificate file will contain server certificate, root certificate and intermediate certificate.
Intermediate certificate is optional.
Checking intermediate certificate is present or not.
Double click the server certificate (in my case example.com.crt)
Extracting Server, root and intermediate Certificate
Navigate to certification tab. You will chai! n find chain of certificates. Root certificate followed by intermediate certificate (optional) followed by server certificate
Extract root and intermediate certificates from the certificate
To extract root certificate double click on root certificate.
Navigate to Details tab and click Copy to File button.
Click next and navigate to Export File Format screen and select option Base-64 encoded and click next
In the file to export screen enter the file name you wanted to use for storing root certificate. I have used root.cer as file name.
Click next. Next screen shows summary of Certificate export wizard.
Click finish. You can see the root certificate has been extracted and placed in root.cer file
Click ok to close the export wizard screen and then click ok to close the root certificate screen.
Next step is to extract intermediate certificate. Double click on intermediate certificate (entries between root and server certificate).There may be more than one intermediate certificate.
Please note sometimes it may not contain intermediate certificate.
Follow the same steps to extract the intermediate certificate and store with different name. In my case I am storing as intermediate.cer.
Create certificate chain file which is a concatenation of the server certificate, the intermediate (if one exists) certificate and the root certificate.
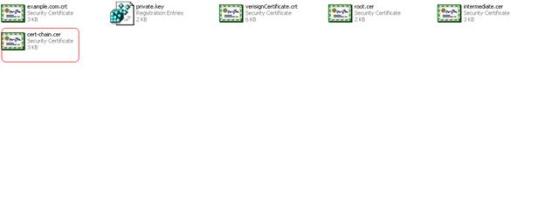
Select server certificate (in my case example.com.crt)and copy & paste the file in the same location and rename to cert-chain.cer(changed extension to cer). This file now contains first part that needs to add to certification chain file.
Open the cert-chain.cer and intermediate.cer file using text editor and append the content! of intermediate certificate file to certification chain file.
Next step is to append the root certificate file to the end of the certificate chain file by using text editor.
Don’t leave any blank line at the end of the certificate chain after appending all the certificates.
Creating a Keystore
- Copy certificate chain file (cert-chain.cer), root certificate (root.cer) and private key (private.key) into the location $MIDDLEWARE_HOME/user_projects/domains/<domain>
- Open the command prompt and run the setDomainEnv.sh to set the environment for the command prompt

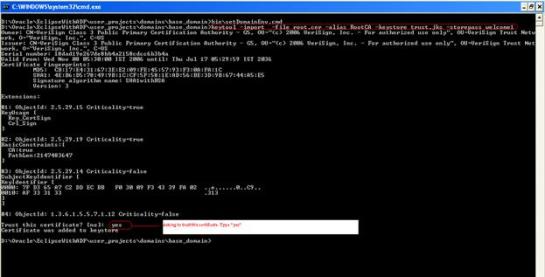
- Create the trust java keystore using the following command.
keytool -import -file <rootcertificatefile> -alias <aliasname> -keystore <keystore-name> -storepass <keystore password>
E.g.: keytool -import -file root.cer -alias RootCA -keystore trust.jks -storepass welcome1
Above command will create the trust keystore with name trust.jks
Enter “yes” if command prompt asking to trust this certificate while creating trust key store.
- Create the identity java keystore using the following command.
java utils.ImportPrivateKey -keystore <identitystore-name> -storepass <store-password> -storetype <store-type> -keypass <keypassword> -alias identity.jks -certfile <certificate-chain file name> -keyf! ile <private key file> -alias <identitystorealias> -keyfilepass <keyfilepassword>
Eg: java utils.ImportPrivateKey -keystore identity.jks -storepass welcome1 -storetype JKS -keypass welcome1 -alias identity.jks -certfile cert-chain.cer -keyfile private.key -alias clientcertificate -keyfilepass welcome1
Above command will create the identity keystore with name trust.jks
Make a note of alias name in the above command which will be used while setting up the SSL through console.
Check the created stores in the location $MIDDLEWARE_HOME/user_projects/domains/<domain>
Configuring the keystore on the WebLogic Server
- Log into the Admin Console, select the server on which you want to configure the SSL certificate.
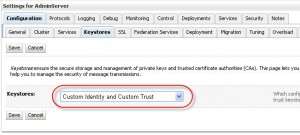
Server –> Click on the Keystore tab. By default it points to the Demo Certificates.
From the dropdown list select the “Custom Identity and Custom Trust” option.
Enter the identity and trust keystore details.
Enter values for :
Custome Identity Keystore: identity.jks
Custome Indetity keystore Type: JKS
Custom Identity Keystore Passphrase:welcome1
Confirm Custom Identity Keystore Passphrase:welcome1
Custom Trust Keystore:trust.jks
Custom Trust Keystore Type:JKS
Custom Trust Keystore Passphrase:welcome1
Confirm Custom Trust Keystore Passphrase:welcome1
And click Save
- Configure the identity of the server:
Click on the SSL tab and enter the alias of the private key i.e. clientcertificate in this case and the keypass password(welcome1 in this case).
NOTE: If you enable the SSL for a WebLogic Server, by default it would be One Way SSL. If you want to change to Two Way SSL, you would require to select the two way SSL behavior from the Advanced option list.
- Configure the SSL port.
By default it would be 7002.
Go to server –> General tab –> Specify and enable SSL port.
You can see the below messages in the server logs which indicate that the certificates are loaded.
<Jul 15, 2011 2:24:00 PM IST> <Notice> <Security> <BEA-090171> <Loading the identity certificate and private key stored under the alias clientcertificate from the JKS keystore file D:OracleEclipseWithADFuser_projectsdomainsbase_domainidentity.jks.>
<Jul 15, 2011 2:24:00 PM IST> <Notice> <Security> <BEA-090169> <Loading trusted certificates from the JKS keystore file D:OracleEclipseWithADFuser_projectsdomainsbase_domaintrust.jks.>
Test the setup:
You can test the setup by accessing the admin console (if SSL ! is configured for Admin Server) or any application deployed on the server by accessing it on https protocol.
https://localhost:7002/console
Now verify whether the right certificate is configured or not.
Click on the certificate details and you would find the details about the identity and the RootCA along with the certificate chain.


